本文最后更新于:2023年7月19日 晚上
一、jQuery
二、jQuery与HTML
jQuery 中非常重要的部分,就是操作 DOM 的能力。
jQuery 提供一系列与 DOM
相关的方法,这使访问和操作元素和属性变得很容易。
提示: DOM = Document Object
Model(文档对象模型)
DOM 定义访问 HTML 和 XML 文档的标准
##### 1. 获取DOM的内容
2.改变DOM的内容(设置内容)
text()、html()、val() 设置值
1 2 3 4 5 6 7 8 9 10 11 12 13 14 15 16 17 18 19 20 21 22 23 <script > $(document ).ready (function ( $("#btn1" ).click (function ( $("#test1" ).text ("Hello world!" ); }); $("#btn2" ).click (function ( $("#test2" ).html ("<b>Hello world!</b>" ); }); $("#btn3" ).click (function ( $("#test3" ).val ("Dolly Duck" ); }); }); </script > </head > <body > <p id ="test1" > 这是段落。</p > <p id ="test2" > 这是另一个段落。</p > <p > Input field: <input type ="text" id ="test3" value ="Mickey Mouse" > </p > <button id ="btn1" > 设置文本</button > <button id ="btn2" > 设置 HTML</button > <button id ="btn3" > 设置值</button > </body >
attr()设置属性
1 2 3 4 5 6 7 8 9 10 11 12 13 14 15 16 17 18 <script > $(document ).ready (function ( $("button" ).click (function ( $("#w3s" ).attr ( "href" ,"http://www.w3school.com.cn/jquery" "title" ,"W3School jQuery教程" ); }); }); </script > </head > <body > 也是<p > <a href ="http://www.w3school.com.cn" id ="w3s" > W3School.com.cn</a > </p > <button > 改变 href 值</button > <p > 请把鼠标指针移动到链接上,或者点击该链接,来查看已经改变的 href 值。</p > </body >
回调函数
1 2 3 4 5 6 7 8 9 10 11 12 13 14 15 16 17 18 19 20 21 22 23 24 25 <script > $("#btn1").click(function(){ $("#test1").text(function(i,origText){ return "Old text: " + origText + " New text: Hello world! (index: " + i + ")"; }); }); $("#btn2").click(function(){ $("#test2").html(function(i,origText){ return "Old html: " + origText + " New html: Hello <b > world!</b > (index: " + i + ")"; }); }); $("button").click(function(){ $("#w3s").attr("href", function(i,origValue){ return origValue + "/jquery"; }); }); </script >
3.追加
1 2 3 4 5 6 7 8 9 10 11 12 13 14 15 16 17 18 19 20 21 22 23 24 25 <script > $("p" ).append ("Some appended text." ); $("p" ).prepend ("Some prepended text." ); function appendText ({ var txt1="<p>Text.</p>" ; var txt2=$("<p></p>" ).text ("Text." ); var txt3=document .createElement ("p" ); txt3.innerHTML ="Text." ; $("p" ).append (txt1,txt2,txt3); } $("img" ).after ("Some text after" ); $("img" ).before ("Some text before" ); function afterText ({ var txt1="<b>I </b>" ; var txt2=$("<i></i>" ).text ("love " ); var txt3=document .createElement ("big" ); txt3.innerHTML ="jQuery!" ; $("img" ).after (txt1,txt2,txt3); } </script >
4.删除
1 2 3 4 5 6 7 8 9 10 11 12 13 14 15 16 17 18 19 20 21 22 23 24 25 26 27 28 29 30 31 32 <script > $(document ).ready (function ( $("button" ).click (function ( $("p" ).remove (".italic" ); }); }); </script > </head > <body > <p > This is a paragraph in the div.</p > <p class ="italic" > <i > This is another paragraph in the div.</i > </p > <p class ="italic" > <i > This is another paragraph in the div.</i > </p > <script > $(document ).ready (function ( $("button" ).click (function ( $("#div1" ).empty (); }); }); </script > </head > <body > <div id ="div1" style ="height:100px;width:300px;border:1px solid black;background-color:yellow;" > <p > This is a paragraph in the div.</p > <p > This is another paragraph in the div.</p > </div >
5.设置样式
1 2 3 4 5 6 7 8 9 10 11 12 13 14 15 16 17 18 19 20 21 22 23 24 25 26 27 28 29 30 31 32 33 34 35 36 37 38 39 40 41 42 <script > <!-- .表示类,所以.blue 用 addClass 将style绑定到标签上--> $(document ).ready (function ( $("button" ).click (function ( $("h1,h2,p" ).addClass ("blue" ); $("div" ).addClass ("important" ); }); $("button" ).click (function ( $("#div1" ).addClass ("important blue" ); }); $("button" ).click (function ( $("h1,h2,p" ).removeClass ("blue" ); }); $("button" ).click (function ( $("h1,h2,p" ).toggleClass ("blue" ); }); }); </script > <style type ="text/css" > .important { font-weight :bold;font-size :xx-large;} .blue { color :blue;} </style > </head > <body > <h1 > 标题 1</h1 > <h2 > 标题 2</h2 > <p > 这是一个段落。</p > <p > 这是另一个段落。</p > <div > 这是非常重要的文本!</div > <br > <button > 向元素添加类</button >
jQuery中CSS方法
1 2 3 4 5 6 7 8 9 10 11 12 13 14 15 16 17 18 19 20 21 22 23 24 <script > $(document ).ready (function ( $("button" ).click (function ( alert ("Background color = " + $("p" ).css ("background-color" )); }); $("button" ).click (function ( $("p" ).css ("background-color" ,"yellow" ); }); $("button" ).click (function ( $("p" ).css ({"background-color" :"yellow" ,"font-size" :"200%" }); }); }); </script > </head > <body > <h2 > 这是标题</h2 > <p style ="background-color:#ff0000" > 这是一个段落。</p > <p style ="background-color:#00ff00" > 这是一个段落。</p > <p style ="background-color:#0000ff" > 这是一个段落。</p > <button > 返回 p 元素的背景色</button >
jQuery与DOM尺寸
jQuery
尺寸
6. jQuery遍历元素
jQuery
遍历,意为“移动”,用于根据其相对于其他元素的关系来“查找”(或选取)HTML
元素。以某项选择开始,并沿着这个选择移动,直到抵达您期望的元素为止。
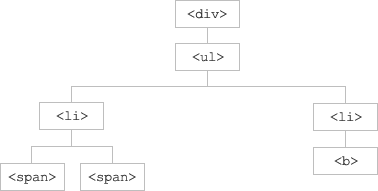
下图展示了一个家族树。通过 jQuery
遍历,您能够从被选(当前的)元素开始,轻松地在家族树中向上移动(祖先),向下移动(子孙),水平移动(同胞)。这种移动被称为对
DOM 进行遍历。
图示解释:
遍历 DOM 树
1 2 3 4 5 6 7 <div> 元素是 <ul> 的父元素,同时是其中所有内容的祖先。
提示: 祖先是父、祖父、曾祖父等等。后代是子、孙、曾孙等等。同胞拥有相同的父。
1.父与子遍历
jQuery遍历父标签
1 2 3 4 5 6 7 8 9 10 11 12 13 14 15 16 17 18 19 20 21 22 23 24 25 26 27 28 29 30 31 32 33 34 35 36 37 38 39 40 41 42 43 44 45 46 47 48 49 50 51 52 53 54 55 56 57 58 59 60 <!DOCTYPE html > <html > <head > <style > .ancestors *{ display : block;border : 2px solid lightgrey;color : lightgrey;padding : 5px ;margin : 15px ;} </style > <script src ="/jquery/jquery-1.11.1.min.js" > </script > <script > $(document ).ready (function ( $("span" ).parent ().css ({"color" :"red" ,"border" :"2px solid red" }); $("span" ).parents ().css ({"color" :"red" ,"border" :"2px solid red" }); $("span" ).parents ("div" ).css ({"color" :"red" ,"border" :"2px solid red" }); $("span" ).parentsUntil ("div" ).css ({"color" :"red" ,"border" :"2px solid red" }); }); $(document ).ready (function ( $("div" ).children ().css ({"color" :"red" ,"border" :"2px solid red" }); $("div" ).children ("p.1" ).css ({"color" :"red" ,"border" :"2px solid red" }); $("div" ).find ("*" ).css ({"color" :"red" ,"border" :"2px solid red" }); }); </script > </head > <body > <div class ="ancestors" > <div style ="width:500px;" > div (曾祖父)<ul > ul (祖父) <li > li (直接父)<span > span</span > </li > </ul > </div > <div style ="width:500px;" > div (祖父) <p > p (直接父)<span > span</span > </p > </div > </div > </body > </html >
2.同胞元素遍历
jQuery遍历子标签
1 2 3 4 5 6 7 8 9 10 11 12 13 14 15 16 17 18 19 20 21 22 23 24 25 26 27 28 29 30 31 32 33 34 35 36 37 38 <style > .sty *{ display : block;border : 2px solid lightgrey;color : lightgrey;padding : 5px ;margin : 15px ;} </style > <script src ="/jquery/jquery-1.11.1.min.js" > </script > <script > $(document ).ready (function ( $("h2" ).siblings ().css ({"color" :"red" ,"border" :"2px solid red" }); $("h2" ).siblings ("p" ).css ({"color" :"red" ,"border" :"2px solid red" }); $("h2" ).next ().css ({"color" :"red" ,"border" :"2px solid red" }); $("h2" ).nextAll ().css ({"color" :"red" ,"border" :"2px solid red" }); $("h2" ).nextUntil ("h6" ).css ({"color" :"red" ,"border" :"2px solid red" }); }); </script > </head > <body class ="sty" > <div > div (父)<p > p</p > <span > span</span > <h2 > h2</h2 > <h3 > h3</h3 > <p > p</p > </div > </body >
3.进一步过滤(筛选)
1 2 3 4 5 6 7 8 9 10 11 12 13 14 15 16 <script > $(document ).ready (function ( $("div p" ).first (); $("div p" ).last (); $("p" ).eq (1 ); $("p" ).filter (".intro" ); $("p" ).not (".intro" ); }); </script >
其他一些遍历的方法
.png)
.png)
.png)
.png)